用JavaScript实现浏览器截图功能的全过程_javascript技巧
最近项目中要实现一个需求:
用户希望在上传文件时能够直接截图上传,并且要求能够截图浏览器外的内容。
多方查找之下找到了类似的解决方案,但个人感觉操作上有些抽象,仅供参考。
const startButton = document.getElementById('start-screenshot'); // 开始截图按钮const screenshotContainer = document.getElementById('screenshot-container'); // 获取的图片展示区const canvas = document.getElementById('screenshot-canvas'); // canvasconst ctx = canvas.getContext('2d');const selectionArea = document.getElementById('selection-area'); // 截图区域const toolbar = document.getElementById('screenshot-toolbar'); // 截图时右下角的小弹框const confirmButton = document.getElementById('confirm-screenshot'); // 确认按钮const cancelButton = document.getElementById('cancel-screenshot'); // 取消按钮
变量定义
function updateSelectionArea() { const width = Math.abs(endX - startX); const height = Math.abs(endY - startY); const left = Math.min(startX, endX); const top = Math.min(startY, endY); selectionArea.style.display = 'block'; selectionArea.style.left = left + 'px'; selectionArea.style.top = top + 'px'; selectionArea.style.width = width + 'px'; selectionArea.style.height = height + 'px'; // 更新工具栏位置 toolbar.style.display = 'flex'; toolbar.style.left = (left + width + 5) + 'px'; toolbar.style.top = (top + height + 5) + 'px';}
确认截图(在这里获取截图结果)
function confirmScreenshot() { if (!isCapturing) return; const width = Math.abs(endX - startX); const height = Math.abs(endY - startY); const left = Math.min(startX, endX); const top = Math.min(startY, endY); // 创建新画布以保存选定区域 const resultCanvas = document.createElement('canvas'); resultCanvas.width = width; resultCanvas.height = height; const resultCtx = resultCanvas.getContext('2d'); // 将选定区域绘制到新画布 resultCtx.drawImage( canvas, left, top, width, height, 0, 0, width, height ); // 在这里获取截图结果 // 如果想生成成一个Base64url const base64Url = resultCanvas.toDataURL(); // 如果想生成成一个file对象 const resultFile = dataURLtoFile(resultCanvas.toDataURL(), "截图.png") // 重置截图状态 resetScreenshot();}
将Base64数据转换为File对象(不需要转换结果为文件对象可以不写这段)
function dataURLtoFile(dataurl, filename) { // 将Base64数据拆分为MIME类型和实际数据 const arr = dataurl.split(','); const mime = arr[0].match(/:(.*?);/)[1]; // 获取MIME类型 const bstr = atob(arr[1]); // 解码Base64数据 let n = bstr.length; const u8arr = new Uint8Array(n); // 将解码后的数据转换为Uint8Array while (n--) { u8arr[n] = bstr.charCodeAt(n); } // 创建并返回File对象 return new File([u8arr], filename, { type: mime });}
取消截图
// 事件监听器startButton.addEventListener('click', startScreenshot);confirmButton.addEventListener('click', confirmScreenshot);cancelButton.addEventListener('click', cancelScreenshot);// 鼠标事件处理canvas.addEventListener('mousedown', function(e) { if (!isCapturing) return; isSelecting = true; startX = e.clientX; startY = e.clientY; endX = e.clientX; endY = e.clientY; updateSelectionArea();});canvas.addEventListener('mousemove', function(e) { if (!isSelecting) return; endX = e.clientX; endY = e.clientY; updateSelectionArea();});canvas.addEventListener('mouseup', function() { isSelecting = false;});// 窗口大小改变时重新设置画布大小window.addEventListener('resize', function() { if (isCapturing) { setCanvasSize(); }});
键盘快捷键(不需要可以不用)
// 键盘快捷键document.addEventListener('keydown', function(e) { // Alt + A 开始截图 if (e.altKey && e.key === 'a') { e.preventDefault(); startScreenshot(); } // Enter 确认截图 if (e.key === 'Enter' && isCapturing) { confirmScreenshot(); } // Esc 取消截图 if (e.key === 'Escape' && isCapturing) { cancelScreenshot(); }});
姑且算是实现了这个需求,但是实现效果并不是很理想,只能说仅供参考吧
到此这篇关于用JavaScript实现浏览器截图功能的文章就介绍到这了,更多相关JS浏览器截图功能内容请搜索脚本之家以前的文章或继续浏览下面的相关文章希望大家以后多多支持脚本之家!
本文地址: https://www.earthnavs.com/jishuwz/38db5ef5b41891ea3f0a.html


全球领先的中文搜索引擎、致力于让网民更便捷地获取信息,找到所求。百度超过千亿的中文网页数据库,可以瞬间找到相关的搜索结果。

黑客街一家做网络安全爱好者导航的web安全网站!专注Hack站点收集,为广大网络安全爱好者提供网站导航,为小白提供黑客入门网站的安全站点收集

慕课网(IMOOC)是IT技能学习平台。慕课网(IMOOC)课程涉及JAVA、前端、Python、大数据等60类主流技术语言,覆盖了面试就业、职业成长、自我提升等需求场景,帮助用户实现从技能提升到岗位提升的能力闭环。

大鱼号是阿里文娱体系为内容创作者提供的统一账号。大鱼号实现了阿里文娱体系一点接入,多点分发。内容创作者一点接入大鱼号,上传图文/视频可被分发到UC、优酷、土豆、淘系客户端,未来还会扩展到豌豆荚、神马搜索、PP助手等。

百度新闻是包含海量资讯的新闻服务平台,真实反映每时每刻的新闻热点。您可以搜索新闻事件、热点话题、人物动态、产品资讯等,快速了解它们的最新进展。

我们梵吉seo专注百度SEO优化领域,本站总结了seo基础入门教程,让零基础的朋友可以快速学会SEO,并提供了SEO快速进阶技术、百度云视频教程、seo面试测试题、seo实战培训。希望可以帮助到更多的新手朋友们!

下载系统-CMS内容管理,素材下载产品及解决方案提供商

【秒开云官网】-24小时不关机系统,下载运行软件不掉线!永久便宜的挂机宝,VPS服务器,云主机,免费云电脑教程,云桌面IP,手机版APP安卓ios苹果软件皆可远程连接使用。

自主上传您的3D模型作品,无限免费下载所有3D模型,分享您的3D模型制作经验,您的3D作品网络存储库,您的CG作品出售平台,模型卖钱网,3D模型共享出售中心:摩尔网

717收录网是一个综合性的网络资源平台,专注于为用户提供便捷、全面的网址导航服务,同时提供自动审核提交收录功能,致力于为广大网友提供专业的互联网资源导航服务


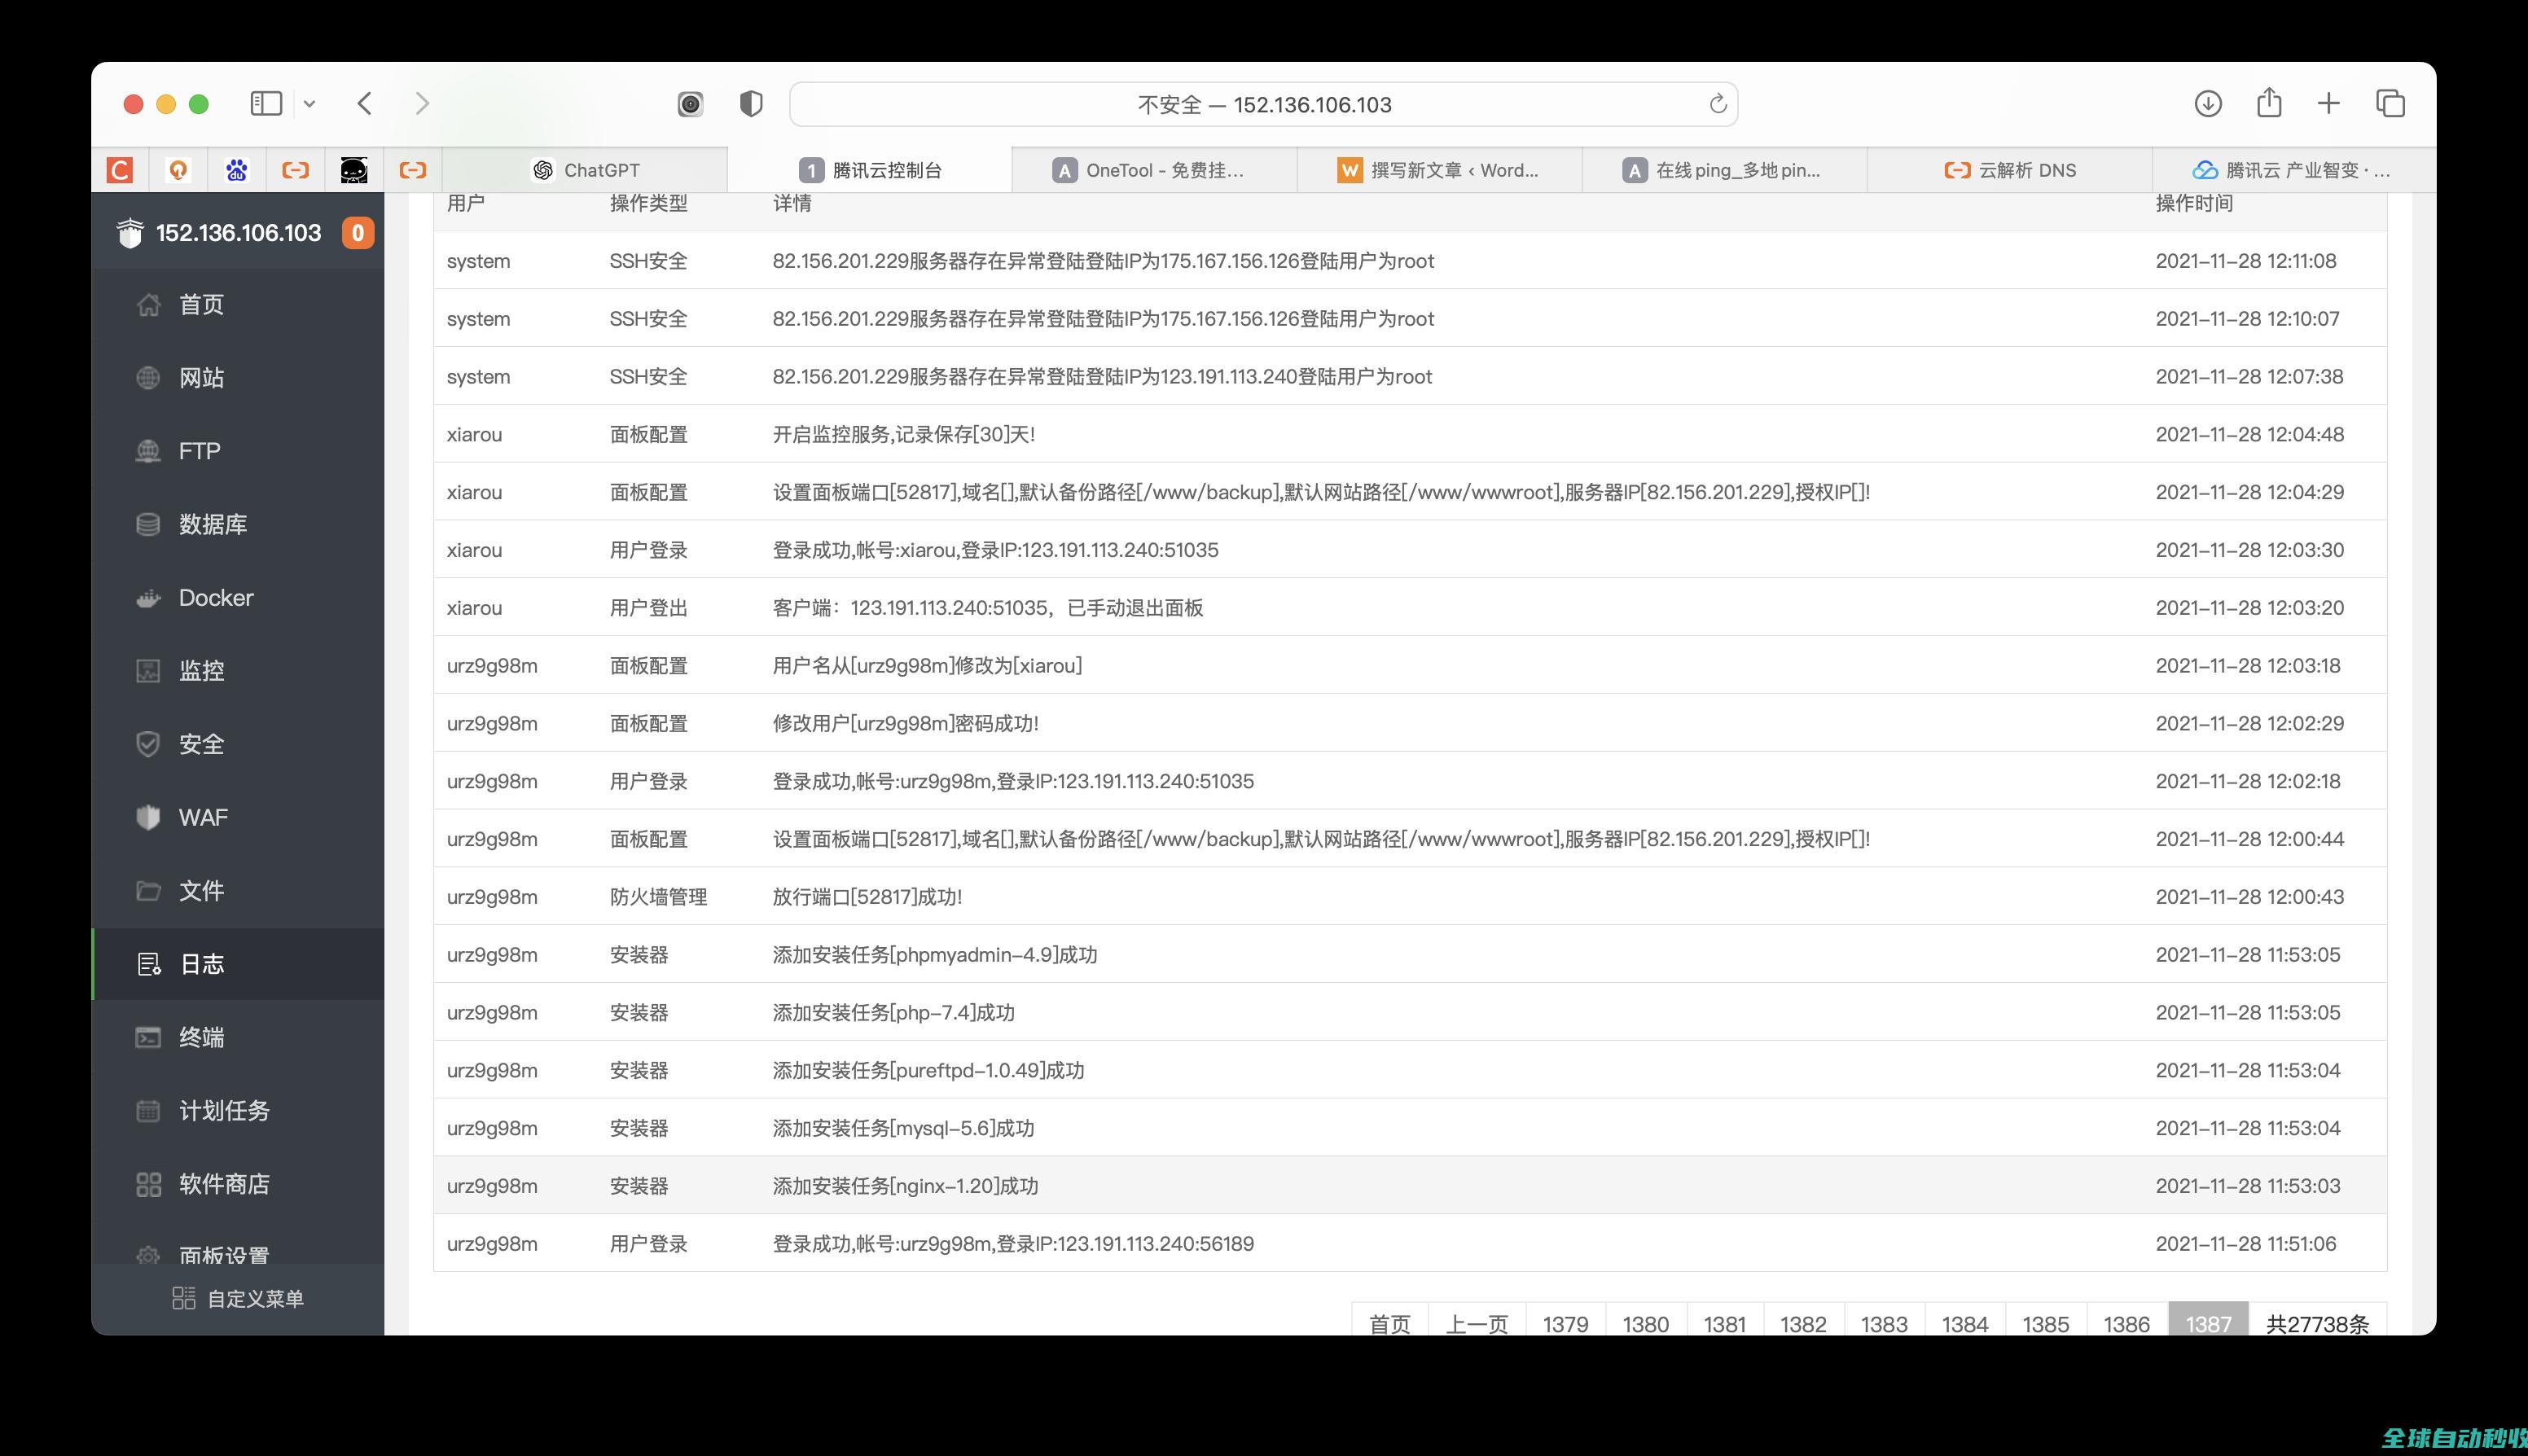
三年前,2021年11月28日在腾讯云买的一台云服务器,配置是:2h4g8m80gSSD+1000G云硬盘,总共不到500元(198+57)!是的,弄了很久的服务器,看看日志:记忆犹新,

缓存机制随处可见,优秀的缓存机制可以缩短网页请求资源的事件,减少延迟,这篇文章主要介绍了前端常见的数据缓存方案及其实现的相关资料,文中通过代码介绍的非常详细,需要的朋友可以参考下
远程登录软件是可以为用户提供方便、安全的远程访问功能,所以一个好的远程登录软件必不可少,当易网提供免费、安全的远程登录软件供大家下载。
当易网为用户提供各种行业软件免费下载,如股票证券、商业贸易、财务管理、彩票工具、行政管理、出版印刷、工程建筑、机械电子、纺织服装、健康医药各行各业常用的软件免费下载.
亦是美网络,致力于操作系统应用与计算机网络技术的IT网站。

当您在VPC子网内创建实例(云服务器、云容器、云数据库等)时,您可以使用系统提供的默认安全组default,您也可以创建其他安全组。无论是默认安全组,还是您创建的安全组,您均可以在安全组内设置出方向和入方向规则,以此控制出入实例的流量。以下为您介绍一些常用的安全组的配置示例:通过本地服务器远程登录云服务器在本地服务器远程连接云服务器上传或

当您已有的云硬盘存储容量不足时,可以通过扩容云硬盘增加弹性云服务器的存储容量。您可以在不中断用户业务的情况下,增加现有云硬盘的存储容量。通过扩容操作,您可以轻松提升云硬盘的空间,确保数据存储的连续性和业务的稳定性。系统盘和数据盘均支持扩容。本文介绍通过管理控制台扩容云硬盘容量的方法,支持扩容单个云硬盘容量,也支持批量扩容云硬盘容量。MBR
当您发现云服务器的运行速度变慢或云服务器突然出现网络断开现象,则可能是由以下原因导致的:云服务器使用共享资源型实例。由于共享型资源实例是多实例共享CPU,当资源不足时,实例间可能出现CPU资源争抢,导致云服务器卡顿。云服务器的带宽和CPU使用率过高。如果您已经通过云监控服务创建过告警任务,当CPU或带宽利用率高时,系统会自动发送告警给您。
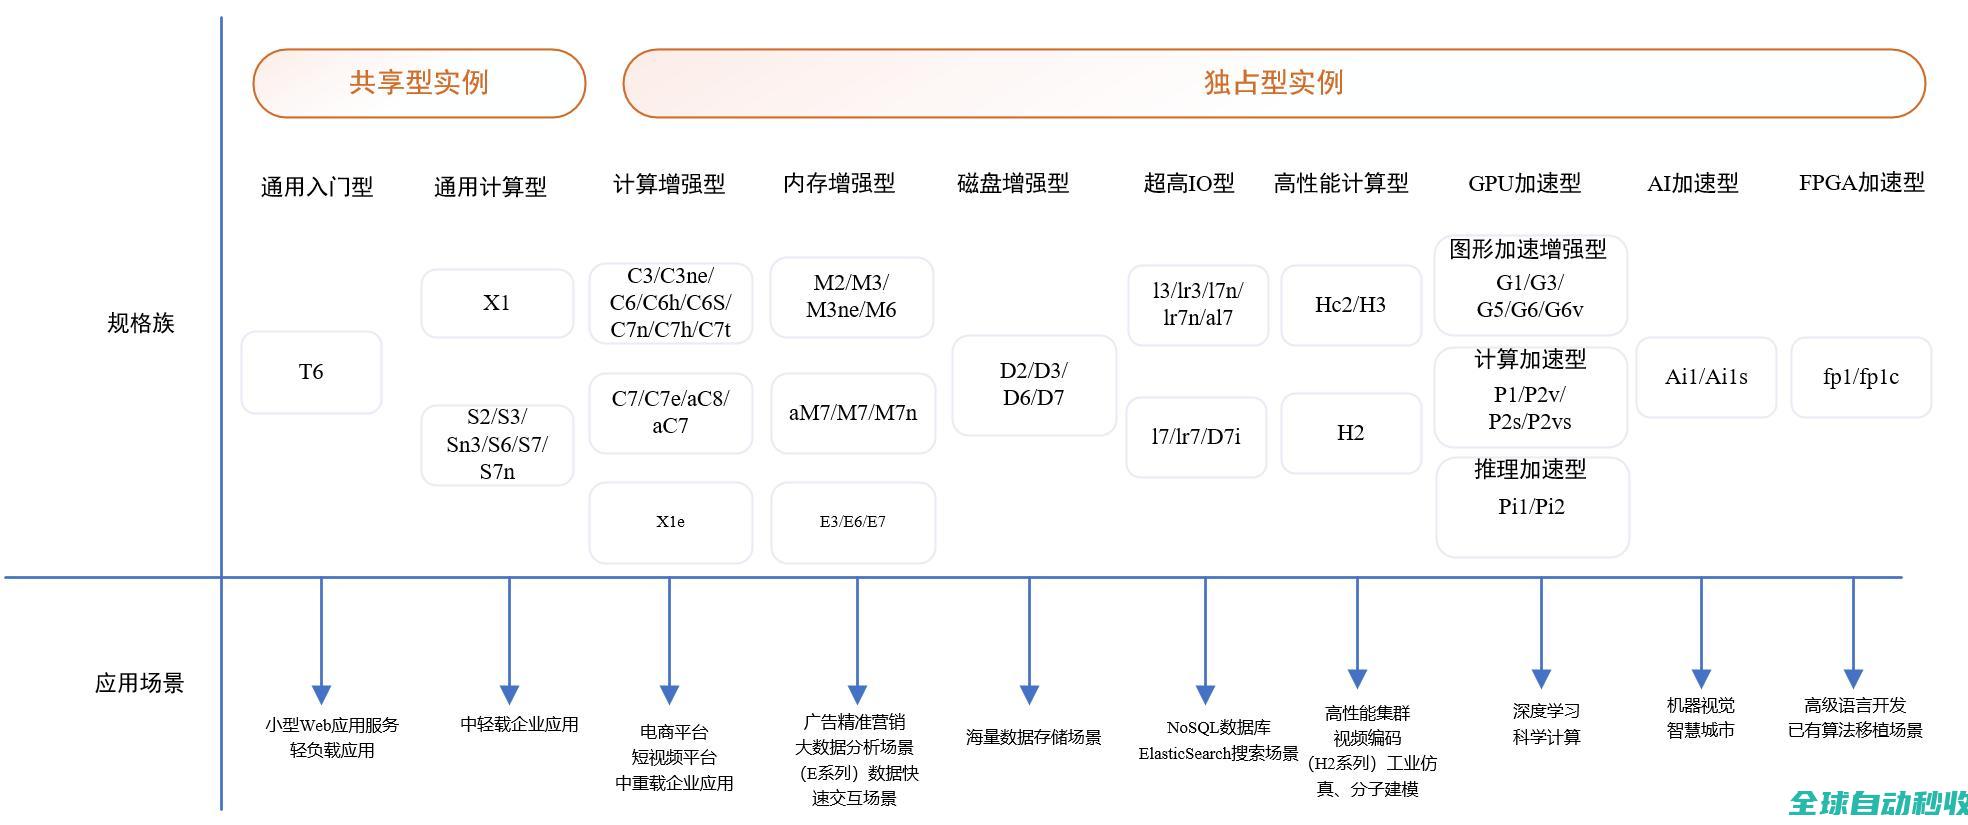
华为云提供了丰富多样的ECS弹性云服务器规格用来满足客户不同业务场景。不同类型的实例可以提供不同的计算能力和存储能力,同一实例类型下可以根据CPU和内存的配置选择不同的实例规格。本节内容主要指导用户选择适用于实际业务场景的ECS云服务器。实例规格清单:了解在售实例规格的详细信息。实例规格命名规则:了解规格命名含义。常见规格指标介绍:了解规

在互联网营销圈,SEO(搜索引擎优化)早就成了老熟人,就像楼下小卖部的老板,每天见都见烦了。但最近冒出个新面孔——GEO(生成式引擎优化),这哥们儿正悄咪咪地走红,虽说和SEO不是一路人,却同样能让品牌内容火得...
Next.js 应用变慢的情况比你想象的更常见,过长的加载时间会让用户感到沮丧,降低参与度,在本文中,我将指出 Next.js 应用中 8 个常见的性能问题,并分享清晰、实用的解决办法,帮助你打造更快、更流畅的用户体验,让用户切实感受到差异,需要的朋友可以参考下
三国游戏哪个最好玩一直是许多三国迷玩家心中的疑问,现在来当易网下载最好玩的三国类手游,包括三国志手游、梦三国手游、三国群英传手游、塔防三国志手游等等,欢迎下载。
亦是美网络,致力于操作系统应用与计算机网络技术的IT网站。

亦是美网络,致力于操作系统应用与计算机网络技术的IT网站。

亦是美网络,致力于操作系统应用与计算机网络技术的IT网站。